Back
Aug 12, 2020
AERGO JDBC를 활용한 게시판 DApp 만들기

아르테미스
AERGO JDBC
AERGO JDBC는 익숙하지 않은 블록체인 관련 언어를 통한 블록체인 앱 개발의 어려움을 해결하기 위해, 많은 개발자에게 친숙한 Java, SQL을 통해 블록체인 앱 개발의 편의성을 제공하는 기술입니다. 이 기술의 동작 방식은 SQLite를 기반으로 하는 AERGO SQL의 스마트 컨트랙트를 통해 AERGO에 하나의 데이터베이스를 구성하고, AERGO JDBC로 해당 데이터베이스에 접근하여 데이터들을 관리할 수 있도록 하는 것입니다. 이 글은 블록체인 앱 개발을 함에 있어 이렇게 편리한 매력을 가지고 있는 AERGO JDBC의 활용 방법을 소개하고자 합니다. 활용 방법을 소개하기 전에 앞서 AERGO JDBC 개발과 관련한 용어들을 설명하겠습니다.
JDBC
JDBC(Java DataBase Connectivity)는 Java를 통해 데이터베이스에 접속하고 데이터들을 데이터베이스에 CRUD(Create/Read/Update/Delete) 등을 할 수 있도록 지원하는 기술입니다.
AERGO JDBC는 Java를 통해 AERGO에 접속하여 배포된 스마트 컨트랙트 주소의 데이터베이스에 있는 데이터들을 관리하는 기술이라고 생각하시면 좋을 것 같습니다.
Spring Data JPA
Spring Data JPA는 Spring 프레임워크에서 제공하는 모듈 중 하나로 데이터 접근 계층의 개발을 빠르고 편리하게 할 수 있도록 하는 기술입니다.
이 기술은 데이터 접근 계층 개발에 있어 반복되었던 Connection, PreparedStatement, ResultSet 등을 인터페이스를 통해 간결하고 용이하게 데이터 접근 계층을 개발할 수 있도록 합니다. 이 글에서는 AERGO JDBC를 Spring Data JPA와 연동하여 빠르고 쉽게 블록체인 앱을 개발할 수 있는 방법 중 하나를 제시하고자 합니다.
게시판 프로젝트
게시판 프로젝트를 주제로 선정하게 된 이유는 데이터의 CRUD를 모두 보여줄 수 있는 가장 기본적인 프로젝트라고 생각했기 때문입니다.
그러면 지금부터 AERGO JDBC를 통해 구현한 게시판을 살펴보도록 하겠습니다.
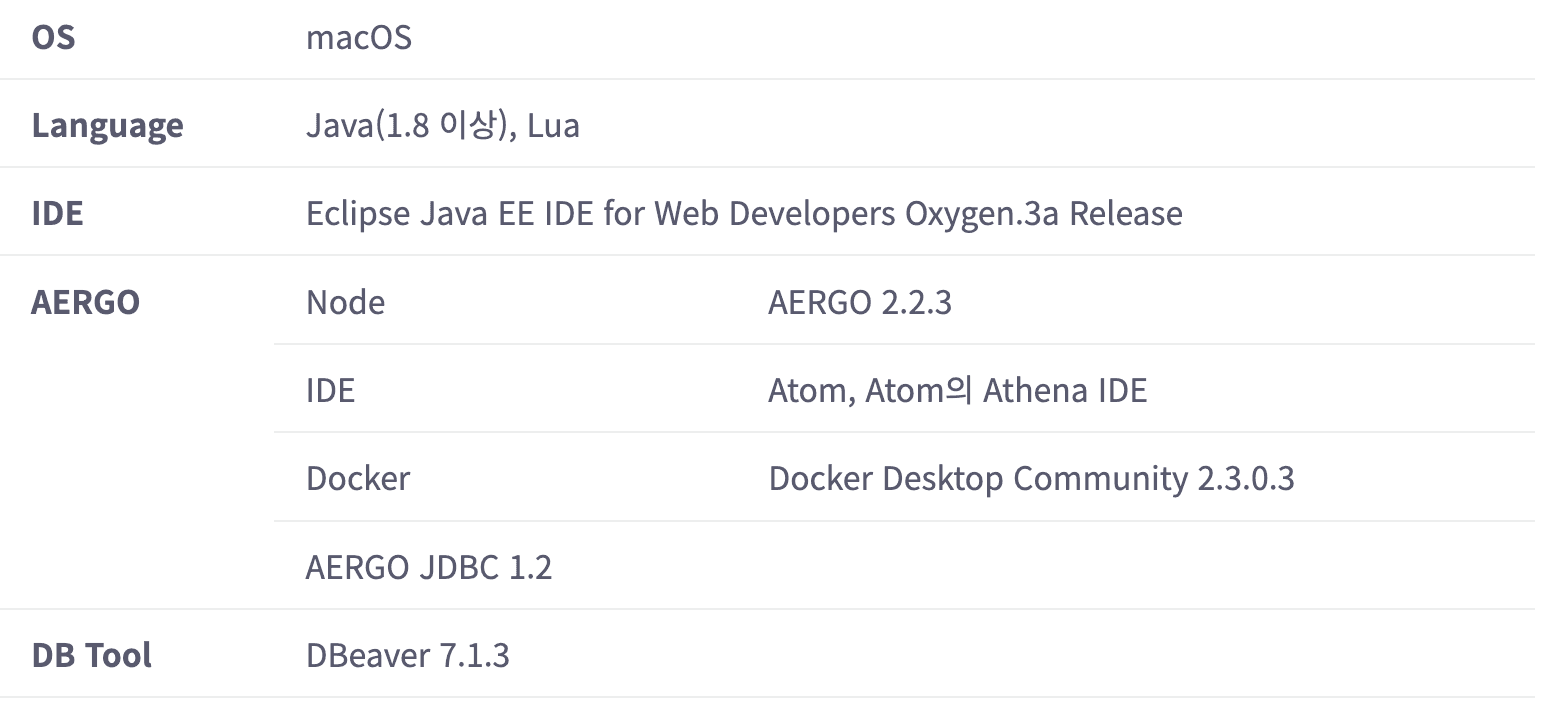
개발 환경
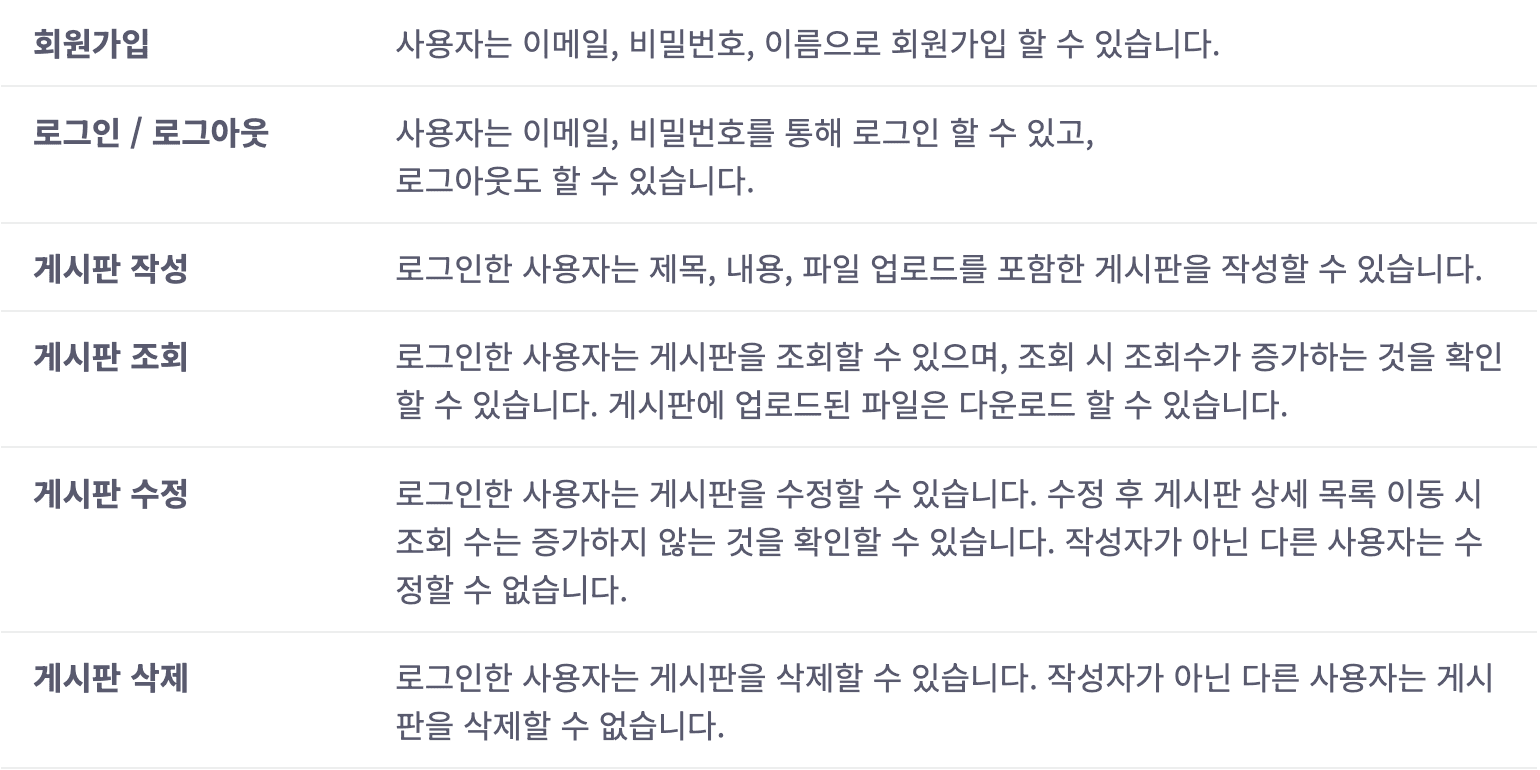
기능
AERGO 및 AERGO JDBC 설정
AERGO를 구성하기 위해 AERGO Tool을 다운로드합니다.
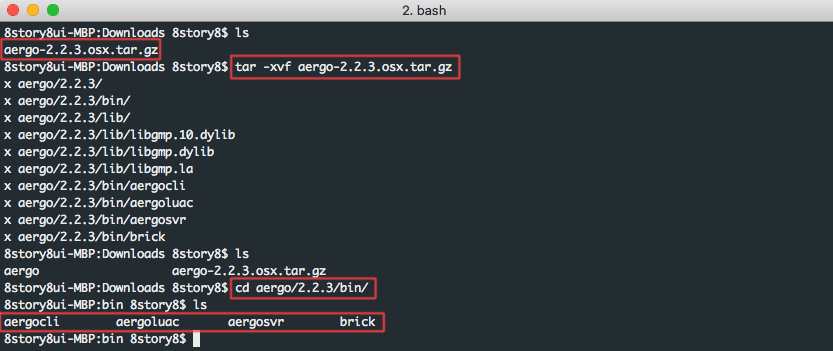
AERGO CLI의 다음 명령어를 통해 Genesis, AERGO JDBC 지갑 키스토어를 생성합니다.
키스토어를 생성하면 해당 지갑의 주소를 확인할 수 있습니다.
./aergocli account new --keystore ${KEYSTORE_PATH} --password ${PASSWORD}

다음 명령어를 통해 해당 지갑의 암호화된 개인키를 확인할 수 있습니다.
./aergocli account export --address ${ADDRESS} --keystore ${KEYSTORE_PATH} --password genesis --wif

다음 명령어를 통해 구동할 AERGO의 키를 생성합니다.
./aergocli keygen server

AERGO 키가 있는 경로에서 Genesis 설정 파일인 genesis.json을 작성합니다.
{
"chain_id":{
"magic":"aergo-community",
"public":false,
"mainnet":false,
"consensus":"dpos",
"version":2
},
"timestamp": 1559883600000000000,
"balance": {
"${GENESIS_ADDRESS}": "100000000000000000000000000",
"${JDBC_ADDRESS}": "100000000000000000000000000"
},
"bps": [
"${SERVER_ID}"
]
}
AERGO 환경 설정 파일인 config.toml을 작성합니다.
# base configurations
datadir = "./blockchain/data"
enableprofile = false
profileport = 6060
enablerest = false
enabletestmode = false
authdir = "./blockchain/auth"
[rpc]
netserviceaddr = "0.0.0.0"
netserviceport = 7845
nstls = false
nscacert = ""
nscert = ""
nskey = ""
nsallowcors = false
[p2p]
# Set address and port to which the inbound peers connect, and don't set loopback address or private network unless used in local network
netprotocoladdr = ""
netprotocolport = 7846
npbindaddr = ""
npbindport = -1
# Set file path of key file
npkey = "./blockchain/server.key"
npaddpeers = [
]
nphiddenpeers = [
]
npmaxpeers = 100
nppeerpool = 100
npexposeself = true
npusepolaris = true
npaddpolarises = [
]
[blockchain]
# blockchain configurations
maxblocksize = 1048576
[mempool]
showmetrics = false
dumpfilepath = "./blockchain/mempool.dump"
[consensus]
enablebp = true
[sql]
maxdbsize = 204800
AERGO 로그 설정 파일인 arglog.toml을 작성합니다.
level = "debug"  # default log level
formatter = "console"  # format: console, console_no_color, json
caller = true  # enabling source file and line printer
timefieldformat = "Jan _2 15:04:05"
[chain]
level = "info"
[dpos]
level = "info"
[p2p]
level = "info"
[consensus]
level = "info"
[mempool]
level = "info"
[contract]
level = "info"
[syncer]
level = "error"
[bp]
level = "info"
AERGO JDBC Github에서 aergojdbc-1.2.0.jar, db-1.2.0.lua를 다운로드합니다.
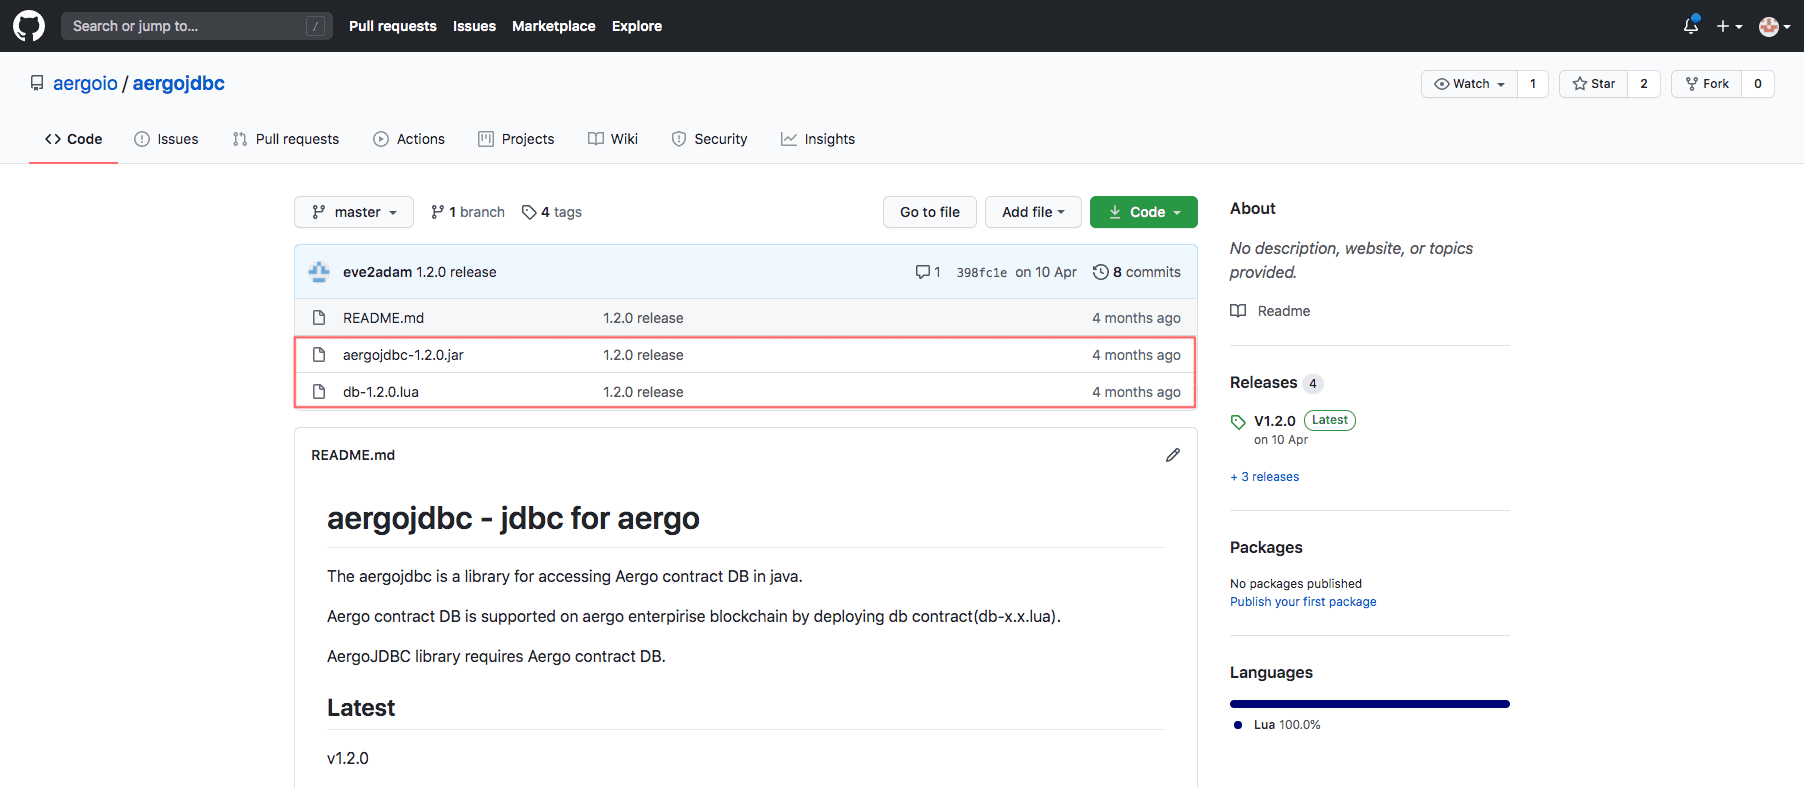
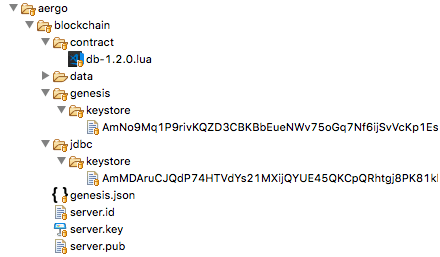
다운로드한 aergojdbc-1.2.0.jar 파일을 다음과 같이 설정합니다.

위와 같은 과정을 거쳐 프로젝트에 AERGO 설정이 미리 되어있는 것을 확인하실 수 있습니다.
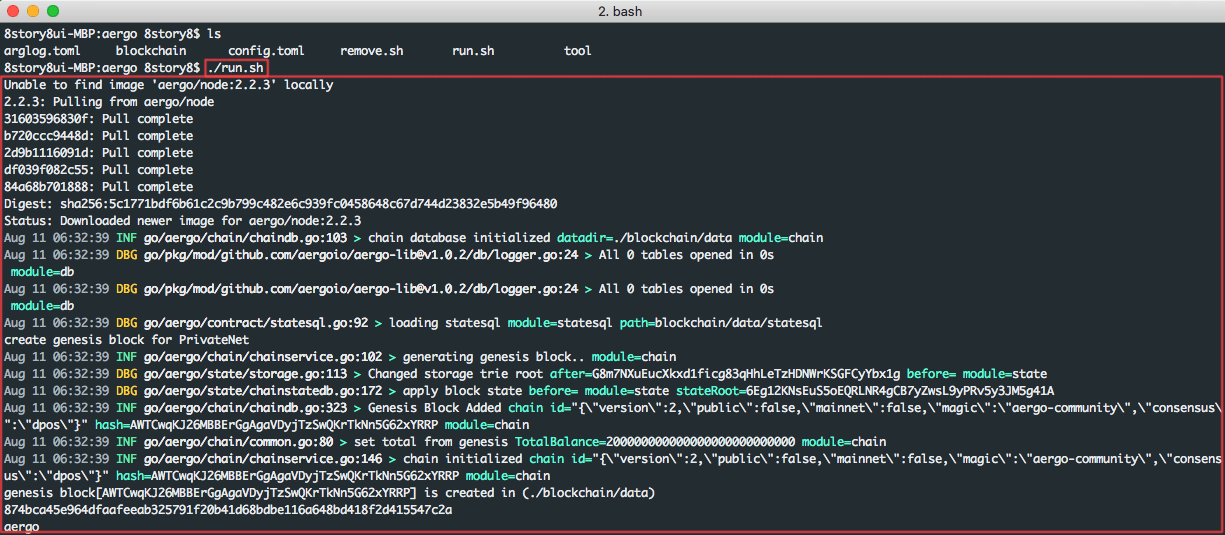
run.sh를 실행하여 AERGO를 구동합니다.
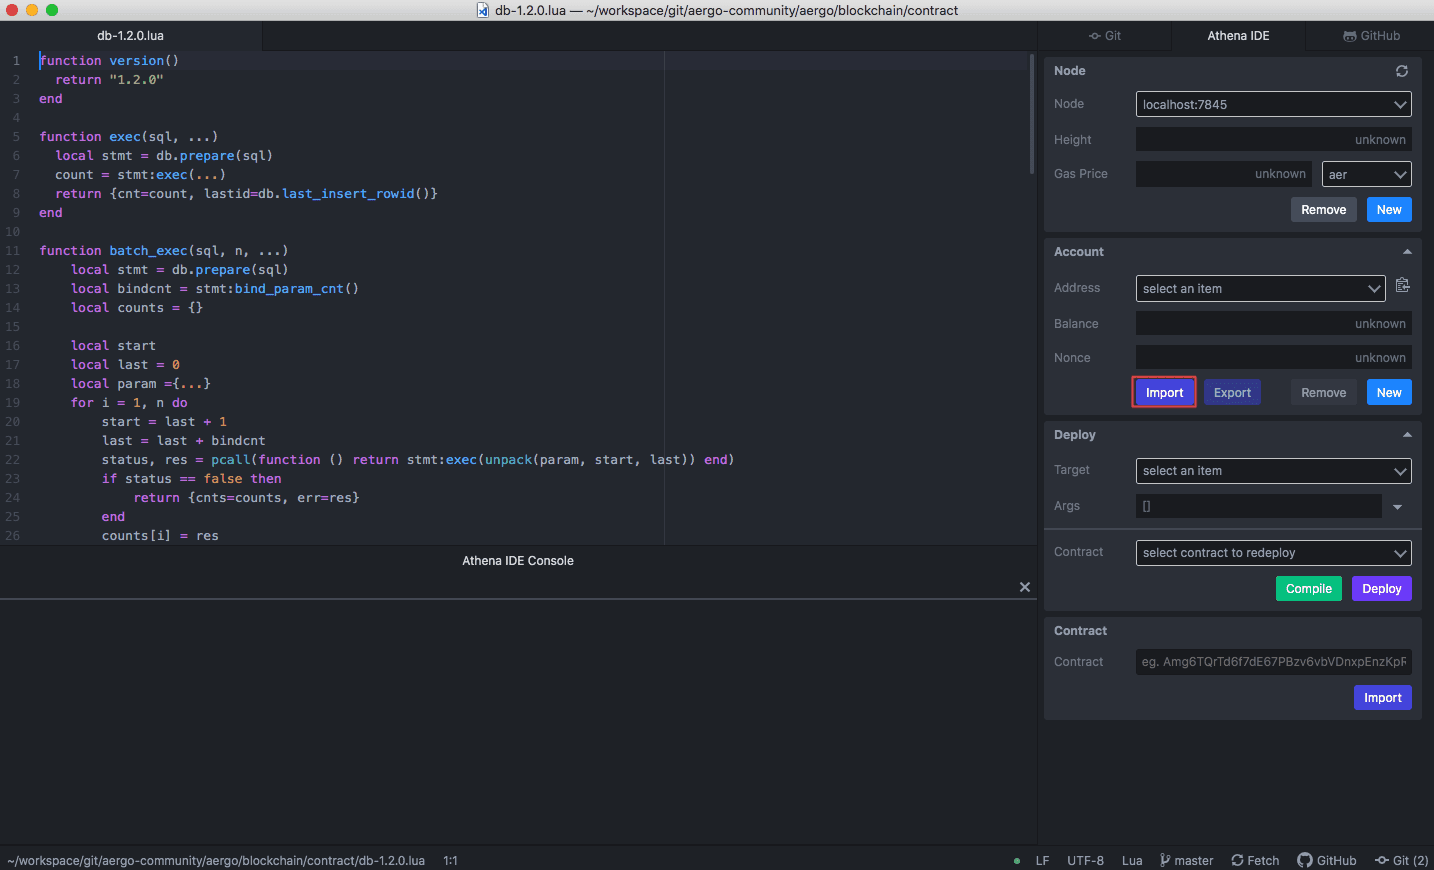
Atom Athena IDE 가이드를 참조하여 Atom과 Athena IDE를 설치합니다.
그리고 AERGO JDBC 스마트 컨트랙트를 배포하기 위해 Import 버튼을 클릭합니다.
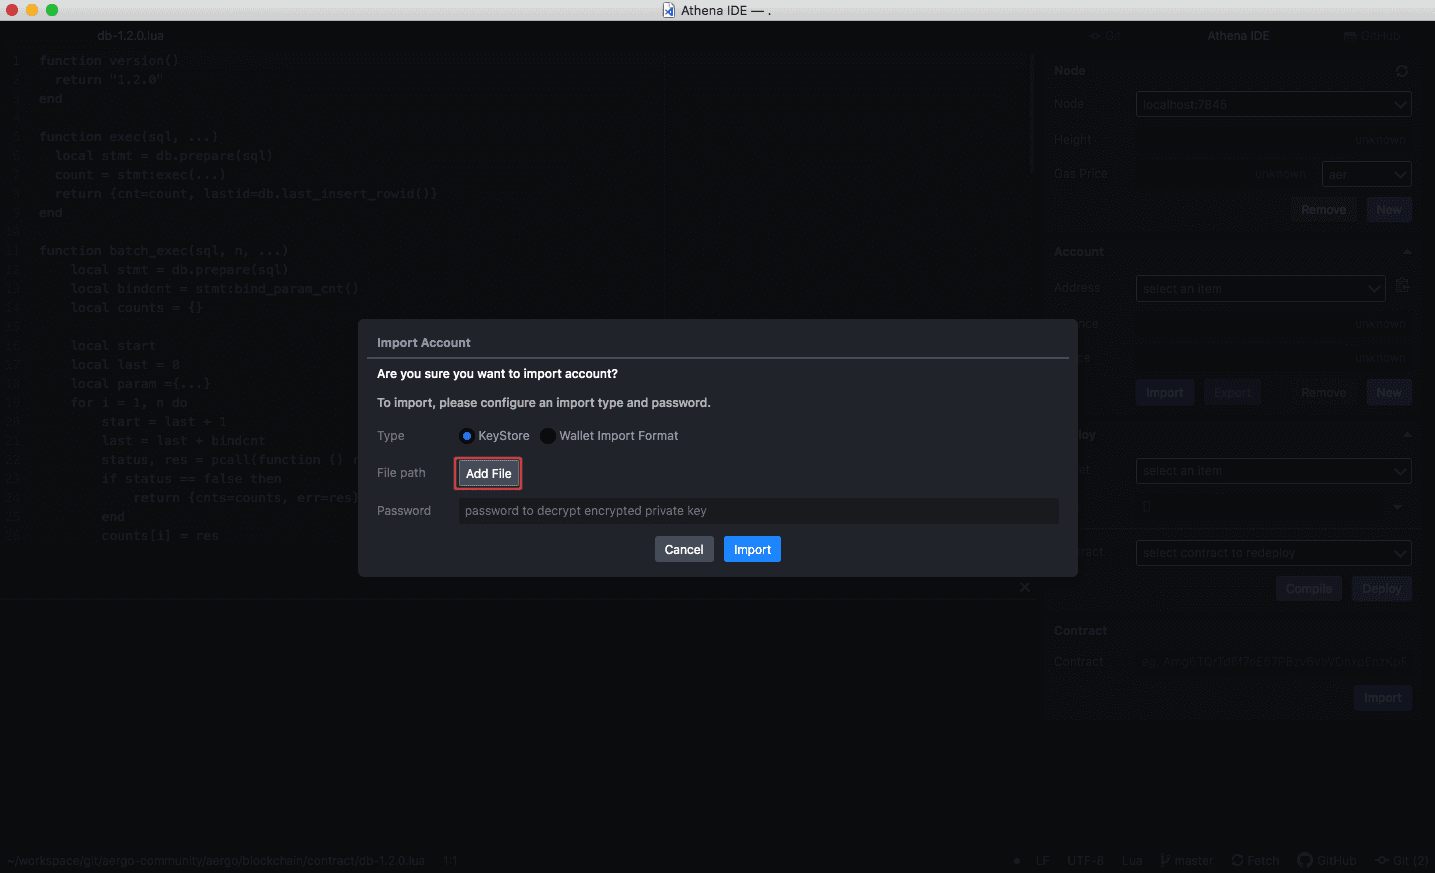
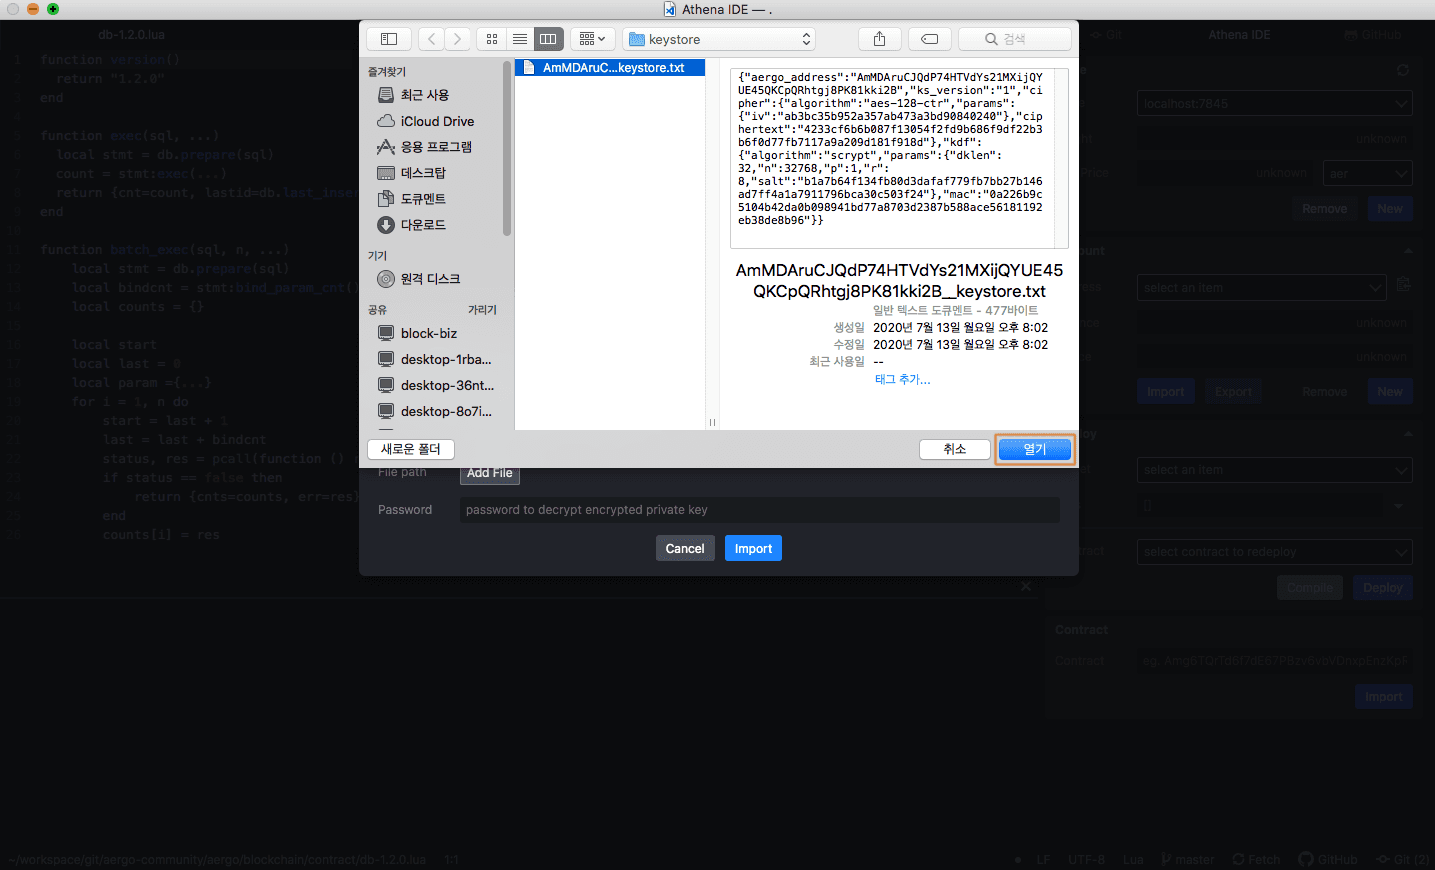
Add file 버튼을 클릭하여 사전에 생성한 JDBC 키스토어 파일을 추가합니다.
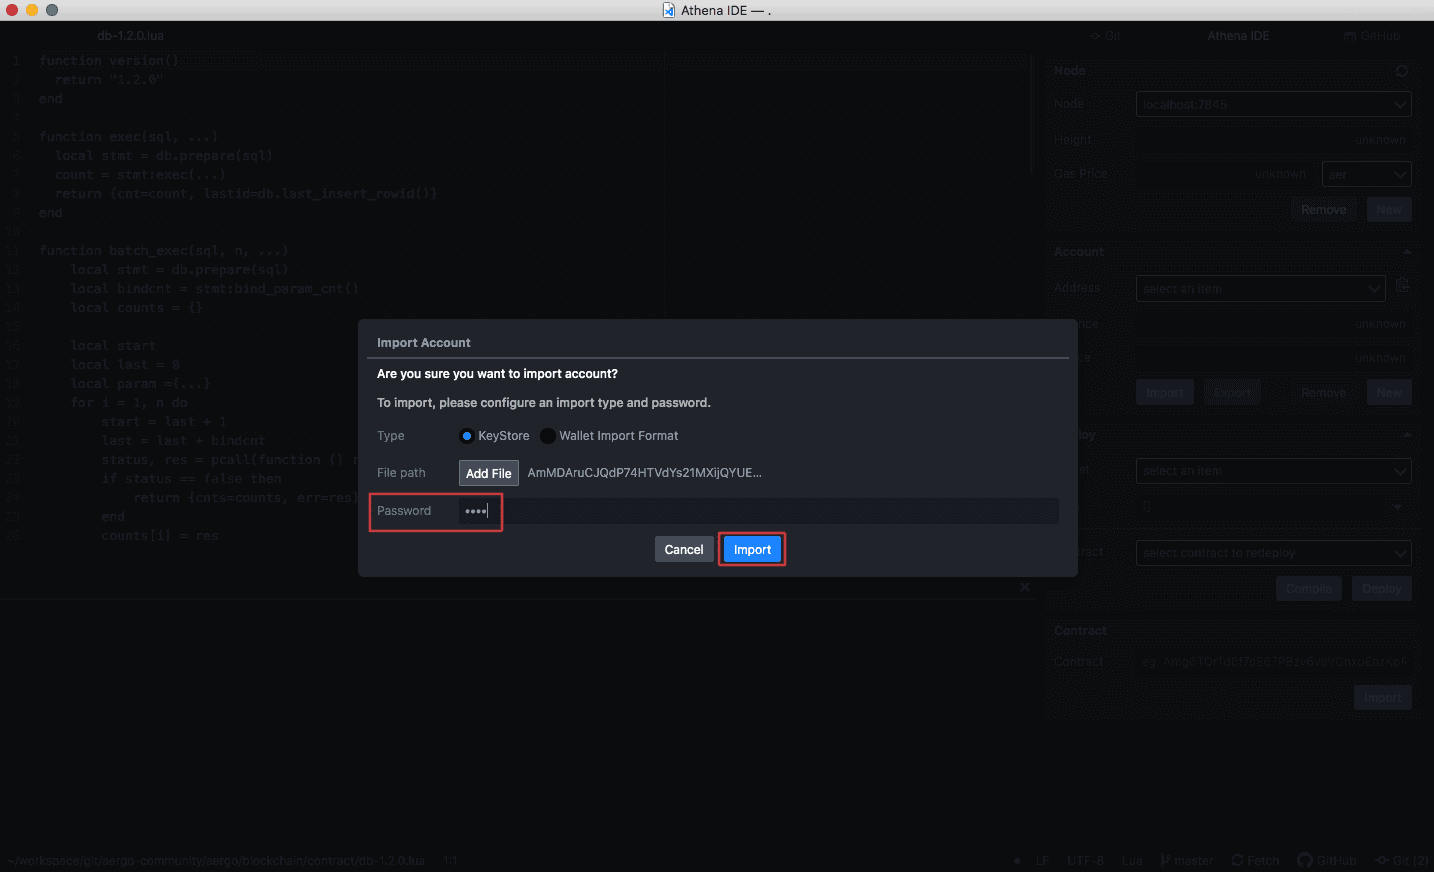
JDBC 키스토어 파일의 비밀번호를 입력한 뒤 Import 버튼을 클릭하여 스마트 컨트랙트 배포 준비를 합니다.
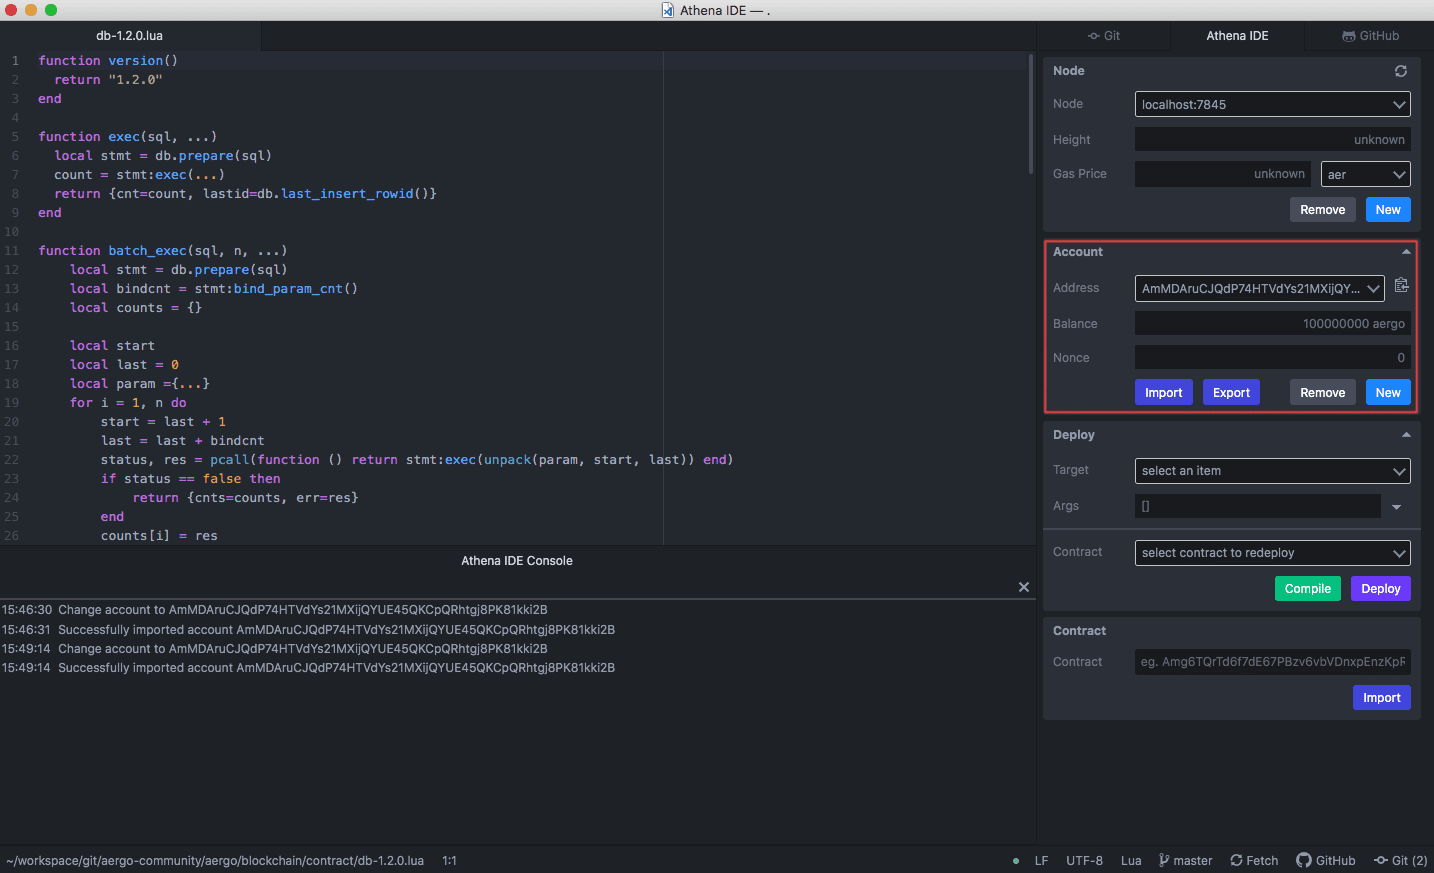
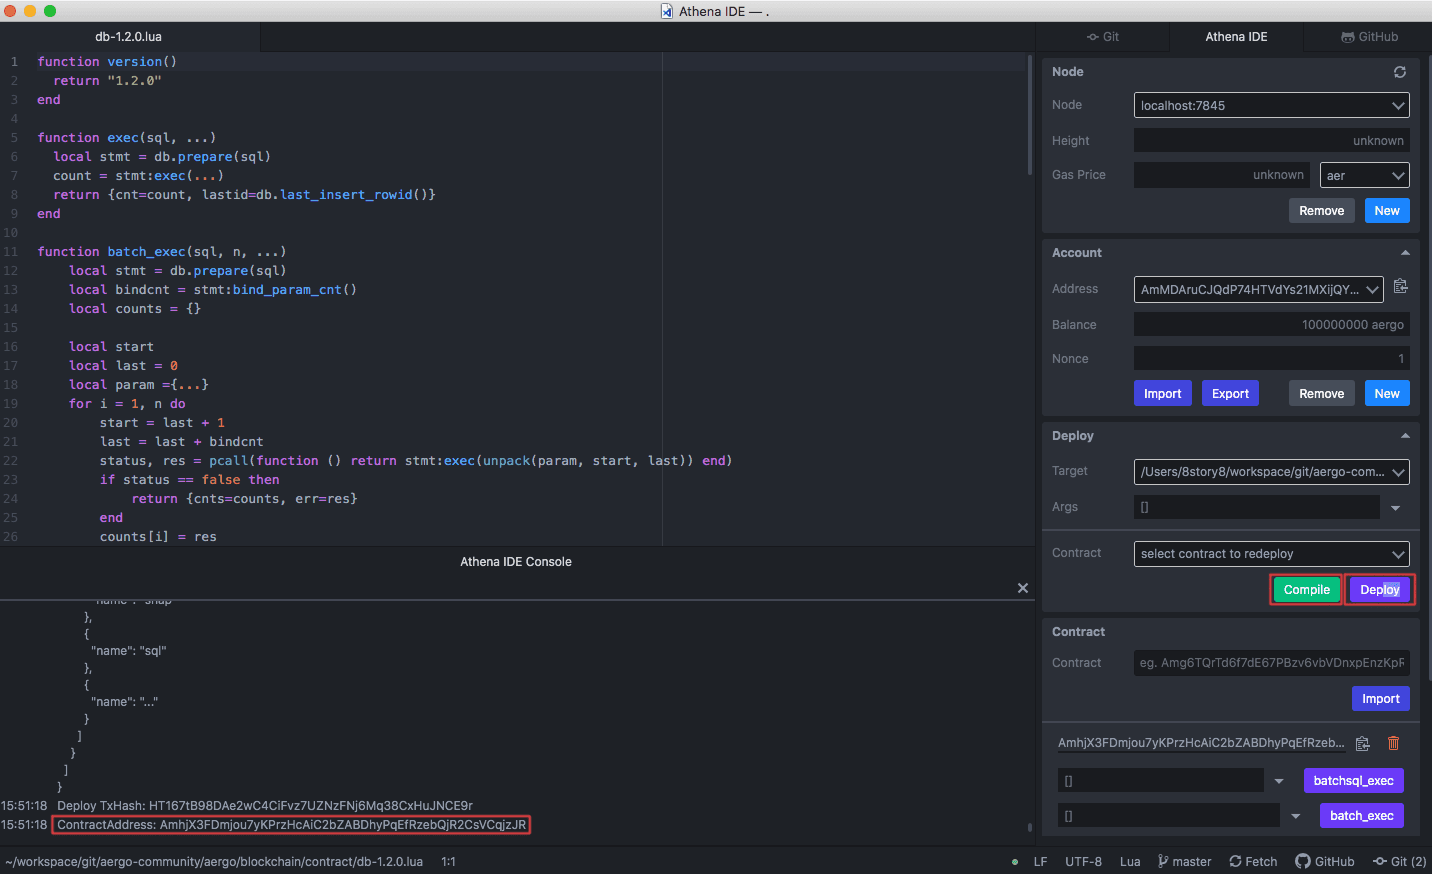
Compile 버튼 클릭 이후 Deploy 버튼을 클릭하여 스마트 컨트랙트를 배포합니다. 정상적으로 배포가 되면 스마트 컨트랙트 주소를 확인할 수 있습니다.
DBeaver 설정
DBeaver는 데이터베이스 툴 중 하나로 배포된 스마트 컨트랙트 주소의 데이터베이스를 확인하기 위해 사용합니다.
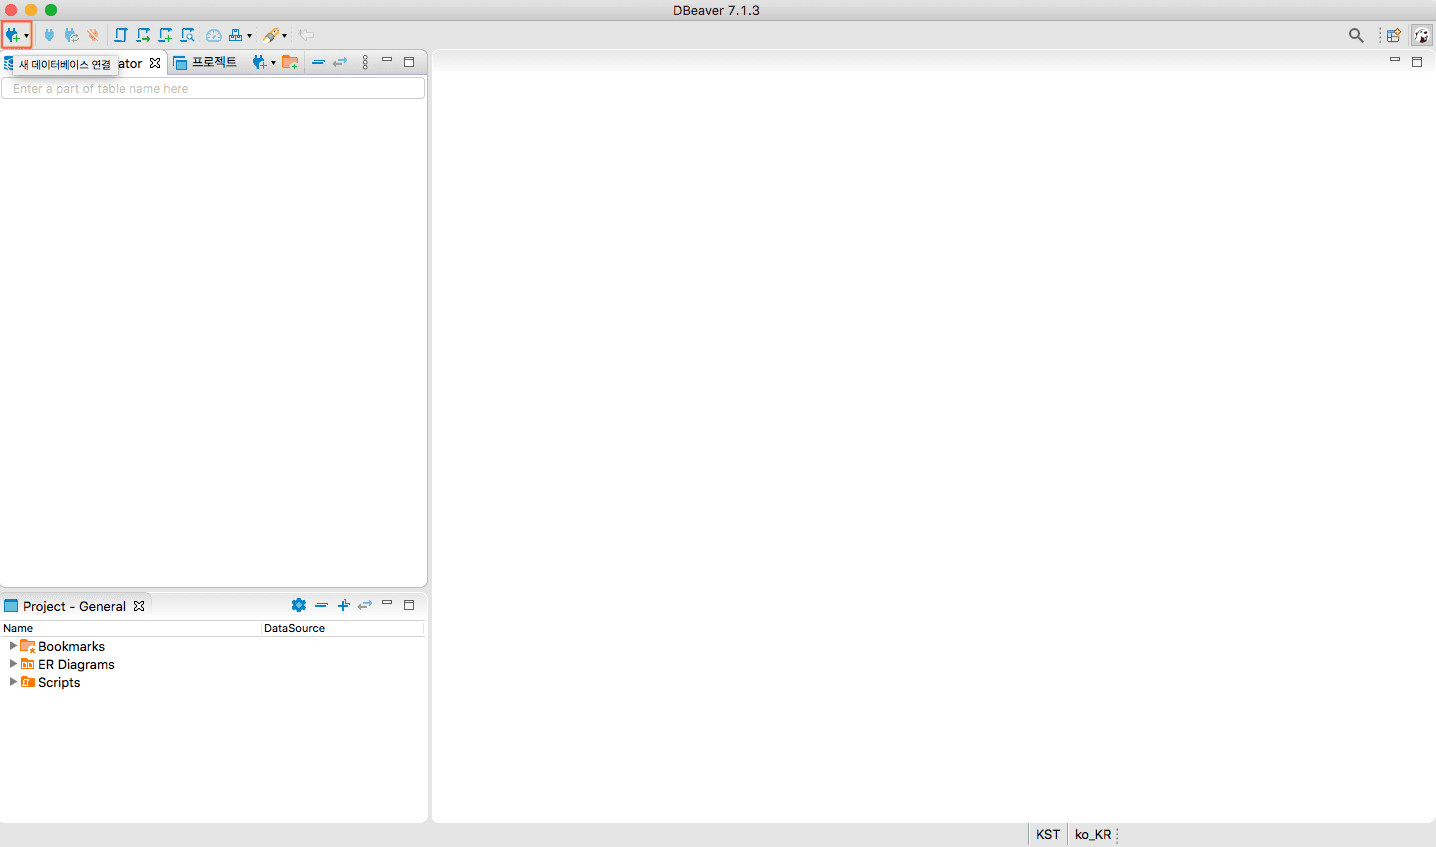
우선 DBeaver를 설치한 뒤 다음과 같이 Connection 생성을 시작합니다.
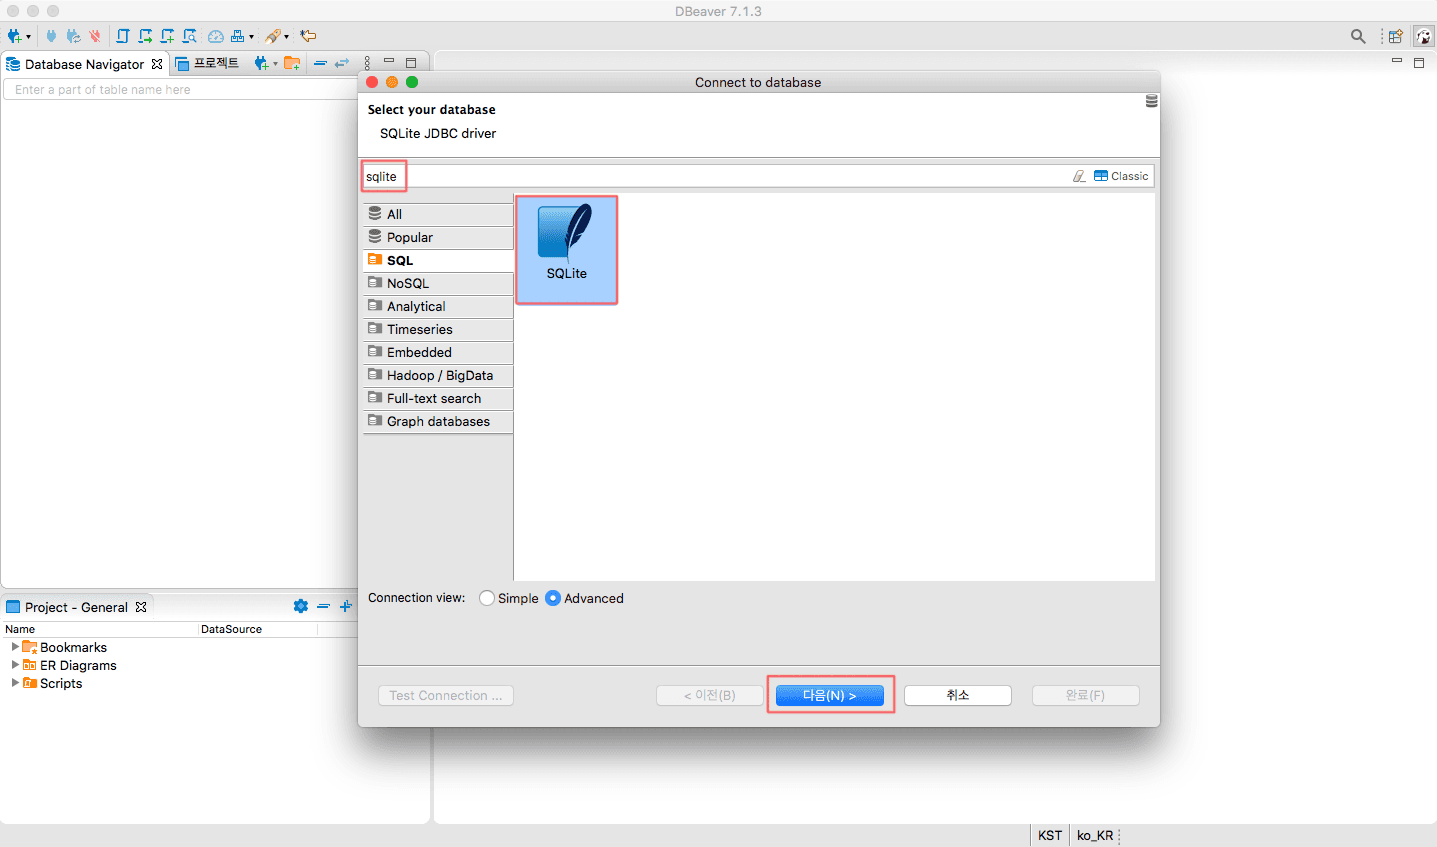
sqlite를 검색한 뒤 SQLite를 선택하고 다음 버튼을 클릭합니다.
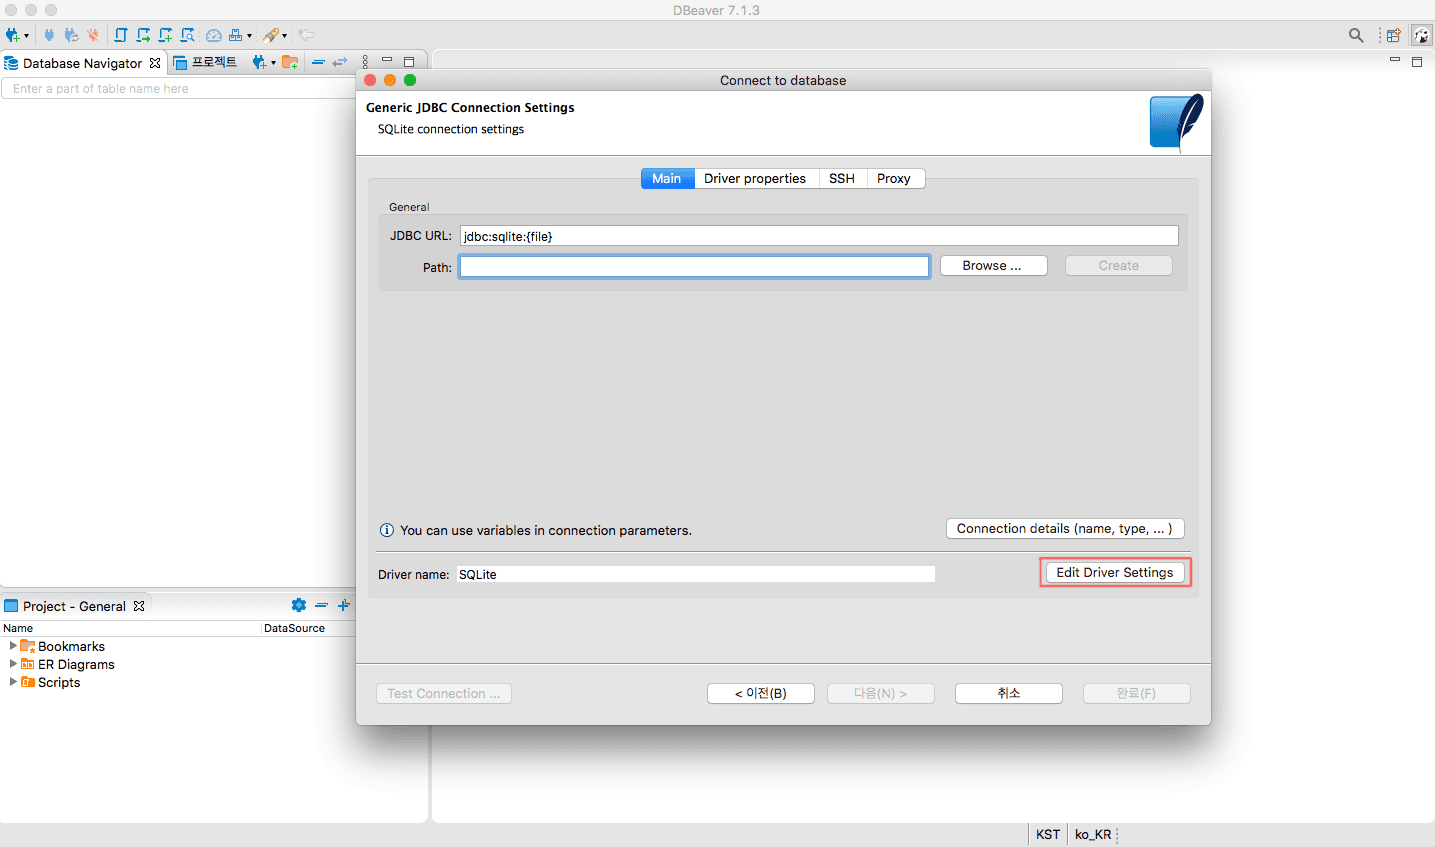
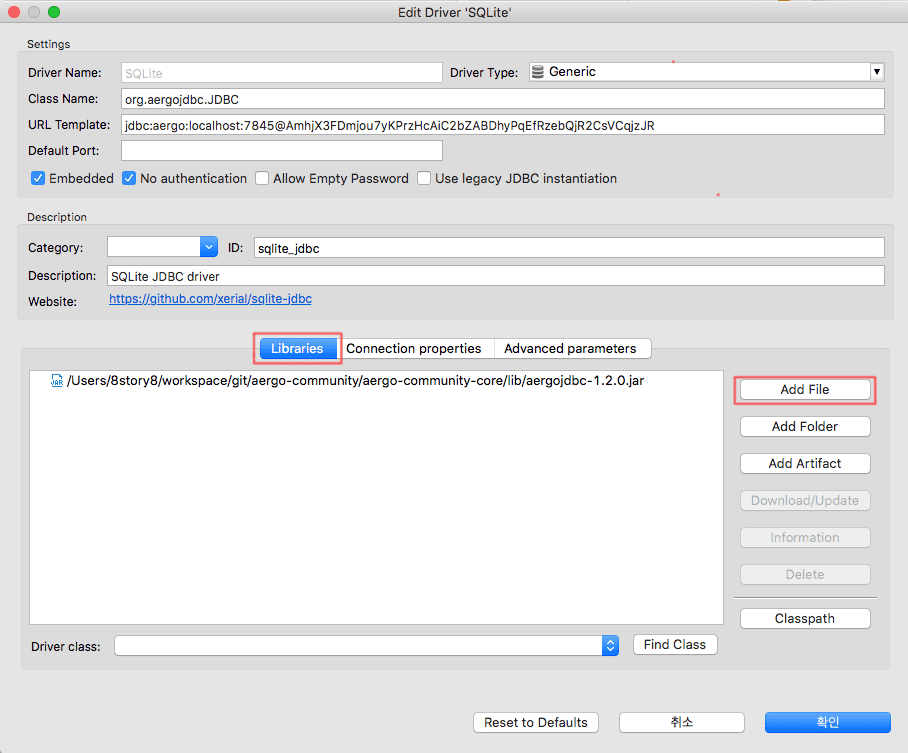
Connection 설정을 하기 위해 Edit Driver Settings를 클릭합니다.
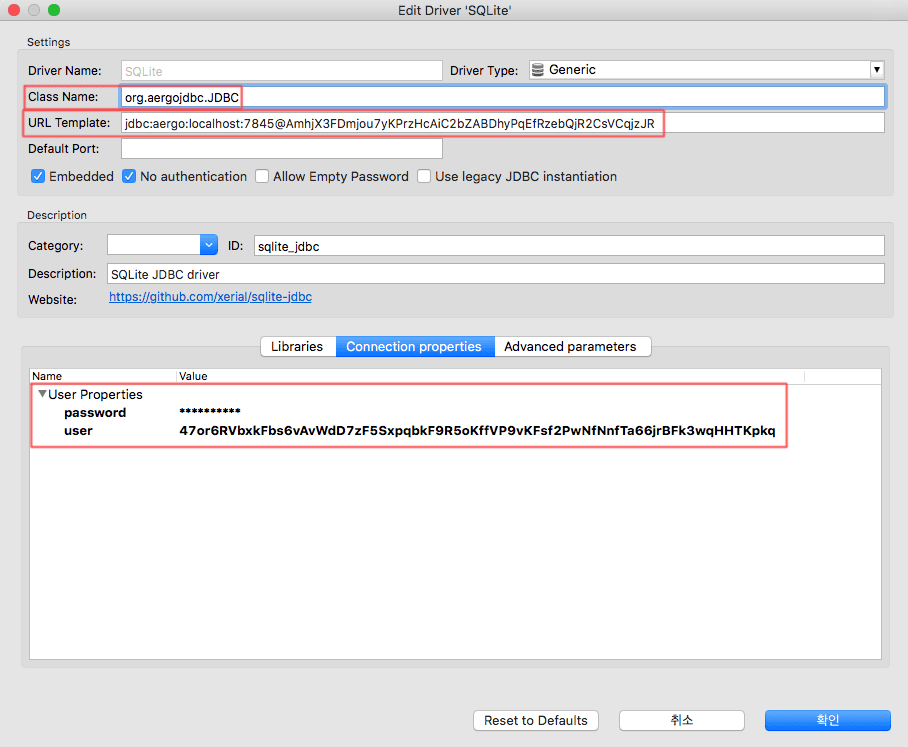
Class Name에 org.aergojdbc.JDBC를 입력합니다.
그리고 URL Template에 application.yaml 파일에 있는 jdbc:aergo:${AERGO_ENDPOINT}@${CONTRACT_ADDRESS}를 입력합니다.
또한 User Properties에 user : ${JDBC_ENCRYPTED_PRIVATE_KEY}, password : ${JDBC_PASSWORD}를 입력합니다.
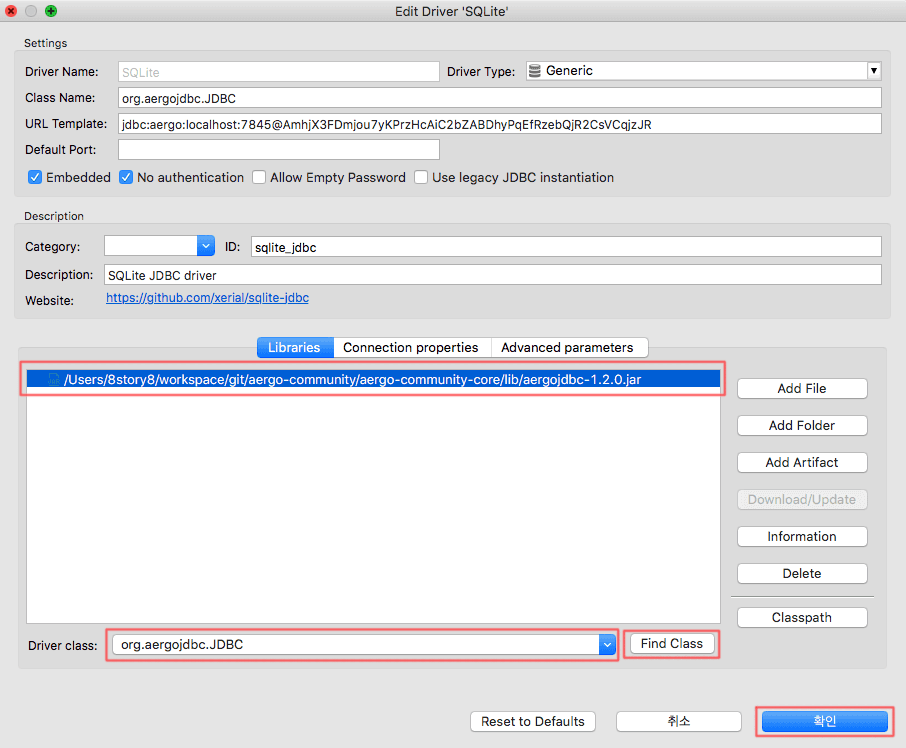
Libraries를 클릭한 뒤 Add File을 클릭하여 다운로드한 aergojdbc-1.2.0.jar을 추가합니다.
Find Class 버튼을 클릭한 뒤 확인 버튼을 클릭합니다.
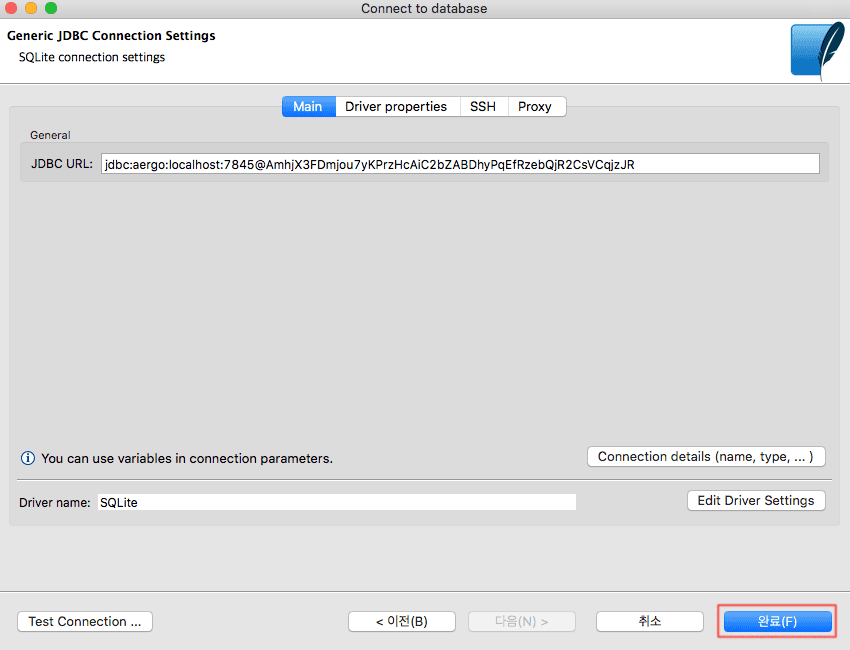
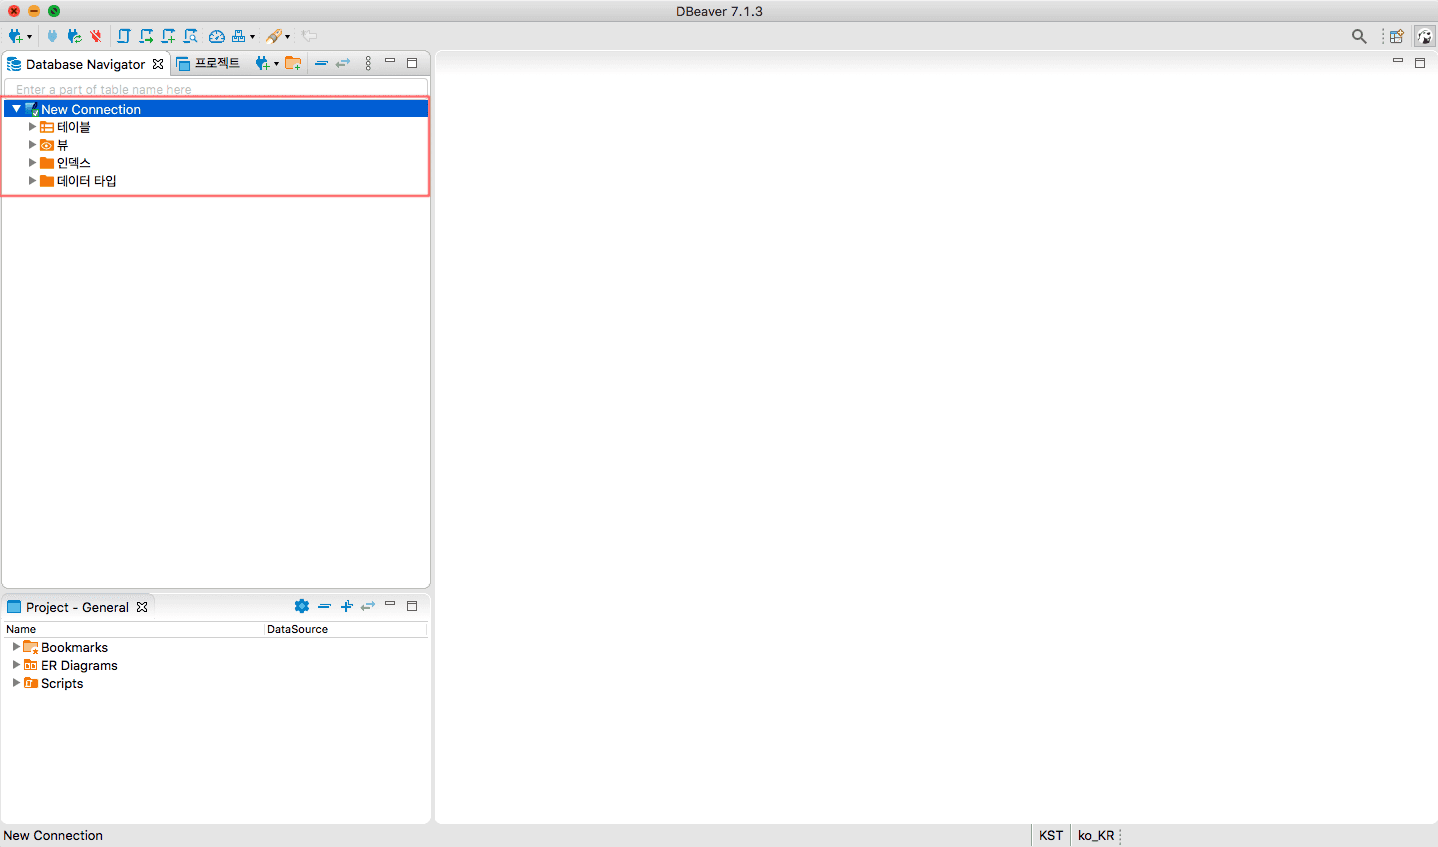
완료 버튼을 클릭하여 배포된 스마트 컨트랙트 주소의 데이터베이스에 접속합니다.
프로젝트 설정
gradle.properties로 의존성 버전을 다음과 같이 관리합니다.
group=io.blocko
version=1.0
# spring
springBootVersion=2.2.5.RELEASE
# java
sourceJavaVersion=1.8
targetJavaVersion=1.8
# lombok
lombokVersion=1.18.8
# log
slf4jVersion=1.7.25
logbackVersion=1.2.3
# sqlite dialect
# Aergo JDBC를 Spring Data JPA와 연동하기 위해서는 Dialect가 필수입니다.
# JPA가 직접 SQL을 작성하기 때문에 DBMS마다 차이가 나는 SQL에 대응하기 위해서는 벤더별로 모듈이 있어야 합니다.
# ex) Oracle Sequence, MySQL Auto Increment
# Aergo SQL은 SQLite 기반이기 때문에 SQLite Dialect 라이브러리를 사용하기로 했습니다.
sqliteDialectVersion=1.0
# thymeleaf
thymeleafLayoutVersion=2.4.1
프로젝트는 다음과 같이 멀티 프로젝트로 구성했습니다. 자세한 설정은 코드를 참조하시기 바랍니다.

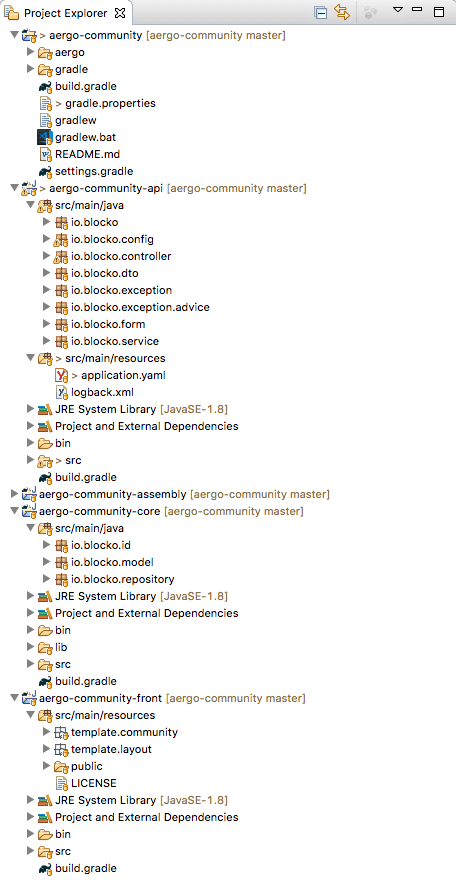
서버 설정 파일인 application.yaml은 다음과 같습니다.
# 서버 포트 설정
server:
port: 8080
# Aergo, Aergo JDBC 환경변수 설정
aergo:
endpoint: localhost:7845
address: AmMDAruCJQdP74HTVdYs21MXijQYUE45QKCpQRhtgj8PK81kki2B
password: jdbc
keystore: /Users/8story8/workspace/git/aergo-community/aergo/blockchain/jdbc
contract:
address: AmhjX3FDmjou7yKPrzHcAiC2bZABDhyPqEfRzebQjR2CsVCqjzJR
# 파일 업로드 경로 설정
file:
upload:
path: /Users/8story8/Desktop/upload
# Aergo JDBC + Spring Data JPA 연동 설정
spring:
datasource:
url: jdbc:aergo:${aergo.endpoint}@${aergo.contract.address}
username: ${aergo.address}
password: ${aergo.password}
driver-class-name: org.aergojdbc.JDBC
hikari:
data-source-properties:
keystore: ${aergo.keystore}
jpa:
# SQL 보기
show-sql: true
hibernate:
# Dialect 설정
database-platform: org.hibernate.dialect.SQLiteDialect
# Server 구동 시 DDL 생성 설정
ddl-auto: create
properties:
hibernate:
# 정돈된 SQL 보기 설정
format_sql: true
# View 설정
thymeleaf:
prefix: classpath:/template/
cache: false
mode: HTML
Entity
테이블과 매핑되는 클래스로 SimpleUser, Board로 구성했습니다.
SimpleUser의 경우 user 테이블, Board의 경우 board 테이블과 매핑되며,
user 테이블과 board 테이블은 일대다 관계입니다.
package io.blocko.model;
import javax.persistence.Column;
import javax.persistence.Entity;
import javax.persistence.GeneratedValue;
import javax.persistence.Id;import javax.persistence.Table;
import org.hibernate.annotations.GenericGenerator;
import lombok.Getter;
import lombok.NoArgsConstructor;
@Entity
@Table(name = "user")
@NoArgsConstructor
@Getter
public class SimpleUser extends TimeEntity {
@Id
@GenericGenerator(name="id_generator", strategy="io.blocko.id.IdGenerator")
@GeneratedValue(generator="id_generator")
private Long id;
@Column
private String email;
@Column
private String password;
@Column
private String name;
public SimpleUser(String email, String password, String name) {
this.email = email;
this.password = password;
this.name = name;
}
}
package io.blocko.model;
import javax.persistence.Column;
import javax.persistence.Entity;
import javax.persistence.GeneratedValue;
import javax.persistence.Id;
import javax.persistence.JoinColumn;
import javax.persistence.ManyToOne;
import javax.persistence.PostLoad;
import javax.persistence.PreUpdate;
import javax.persistence.Transient;
import org.hibernate.annotations.GenericGenerator;
import lombok.Getter;
import lombok.NoArgsConstructor;
import lombok.Setter;
@Entity
@NoArgsConstructor
@Getter
@Setter
public class Board extends TimeEntity {
@Id
@GenericGenerator(name = "id_generator", strategy = "io.blocko.id.IdGenerator")
@GeneratedValue(generator = "id_generator")
private Long id;
@Column
private String title;
@Column
private String content;
@Column
private String fileName;
@Column
private String filePath;
@Column
private Integer viewCount;
/**
* 게시판 목록에서 특정 게시글을 클릭했을 때 해당 게시글의 조회수가 증가하게 되는데
* 이때 Time Entity의 @PreUpdate 어노테이션으로 게시글 수정일도 함께 저장되는 문제가 있었습니다.
* 이를 방지하기 위해 @Transient 어노테이션을 통해 데이터베이스와 매핑되지 않는 이전 상태의 조회수 변수를 정의합니다.
* 그리고 @PostLoad 어노테이션을 통해 현재 조회수를 이전 조회수에 저장합니다.
* TimeEntity의 @PreUpdate 어노테이션이 걸린 setUpdatedDate 메서드를 Overriding하여,
* 이전 조회수와 증가한 조회수가 다르면 수정일을 데이터베이스에 저장하지 않도록 하여 문제를 해결했습니다.
*/
@Transient
private Integer previousViewCount;
@ManyToOne
@JoinColumn(name = "userId", referencedColumnName = "id")
private SimpleUser user;
@PostLoad
public void setPreviousViewCount() {
this.previousViewCount = this.viewCount;
}
@PreUpdate
@Override
public void setUpdatedDate() {
if(!isModifiedViewCount()) {
setUpdatedDate(getDate());
}
}
private boolean isModifiedViewCount() {
boolean isModified = false;
if(this.viewCount != this.previousViewCount) {
isModified = true;
}
return isModified;
}
public Board(String title, String content, Integer viewCount, SimpleUser user) {
this.title = title;
this.content = content;
this.viewCount = viewCount;
this.user = user;  }
public Board(String title, String content, String fileName, String filePath, Integer viewCount, SimpleUser user) {
this.title = title;
this.content = content;
this.fileName = fileName;
this.filePath = filePath;
this.viewCount = viewCount;
this.user = user;
}
}
Repository
각각의 Entity에 상응하는 저장소로 AERGO에 데이터를 생성/조회/수정/삭제할 수 있도록 해주는 일종의 DAO입니다.
package io.blocko.repository;
import java.util.Optional;
import org.springframework.data.jpa.repository.JpaRepository;
import io.blocko.model.SimpleUser;
public interface UserRepository extends JpaRepository<SimpleUser, Long>{ Optional<SimpleUser> findOneByEmail(String email); boolean existsByEmail(String email);
}
package io.blocko.repository;
import org.springframework.data.jpa.repository.JpaRepository;
import io.blocko.model.Board;
public interface BoardRepository extends JpaRepository<Board, Long>{
}
Create
UserService의 회원가입 메서드입니다. 회원가입에 필요한 이메일, 비밀번호, 비밀번호 확인, 이름을 받아 save 메서드를 통해 회원가입을 합니다.
public SimpleUser register(UserRegistrationDto registrationDto) {
final String email = registrationDto.getEmail();
final String password = registrationDto.getPassword();
final String name = registrationDto.getName();
if (!password.equals(registrationDto.getConfirmedPassword())) {
throw new UserPasswordNotEqualsException();
}
if (userRepository.existsByEmail(email)) {
throw new UserDuplicationException(email);
}
final SimpleUser user = userRepository.save(new SimpleUser(email, passwordEncoder.encode(password), name));
return user;
}
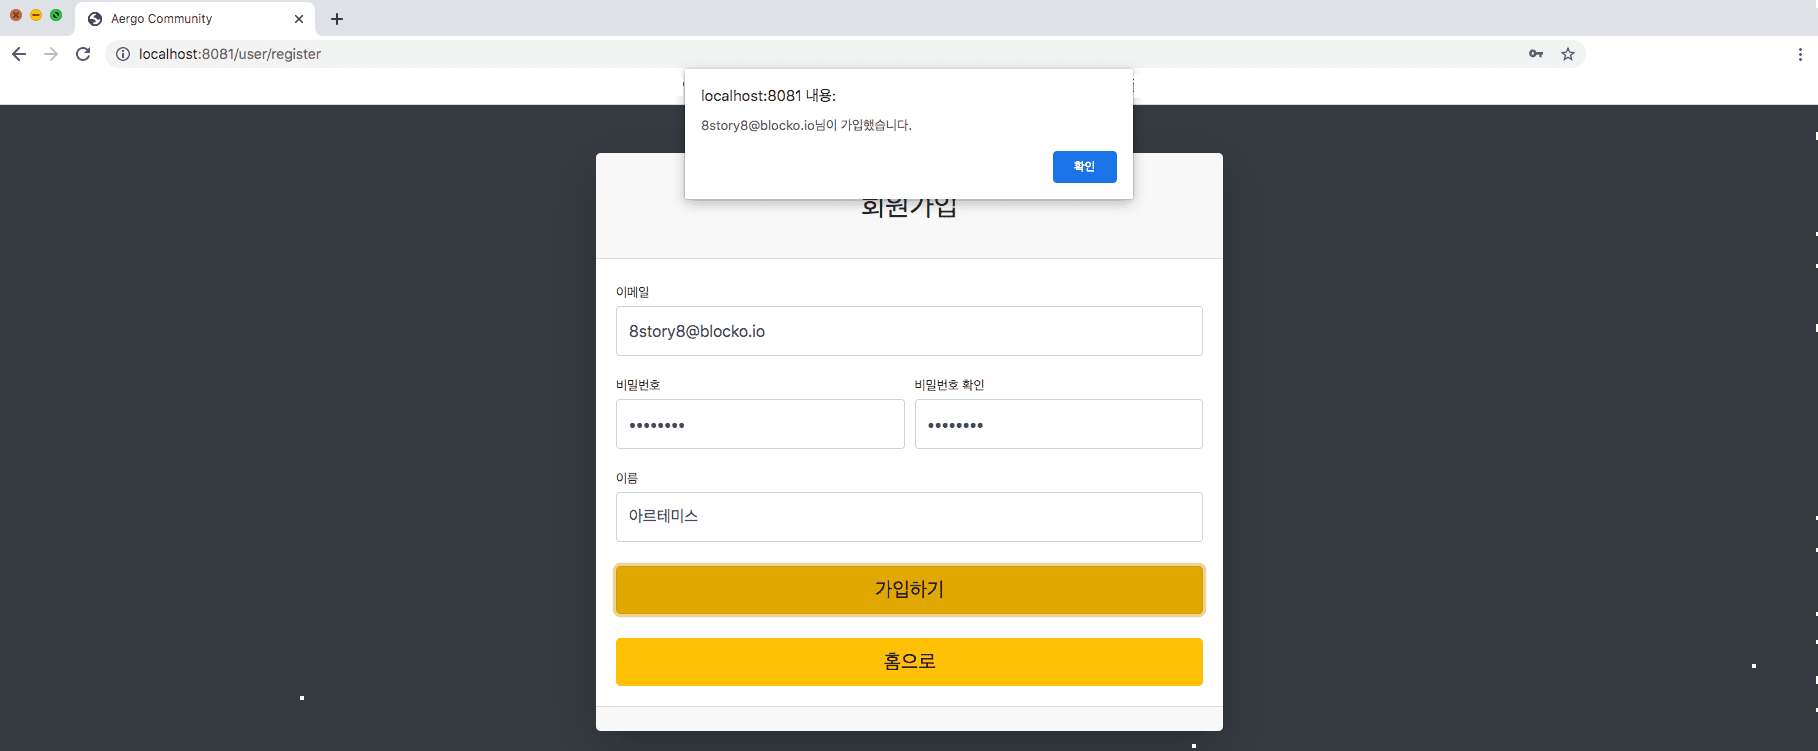
아래의 코드는 ID Generator로 Create 수행 시 ID를 자동으로 생성해주는 클래스입니다. 따라서 회원가입, 게시판 작성 시 사용자의 ID가 생성되어 데이터베이스에 저장되는 것을 확인할 수 있습니다.
import java.io.Serializable;
import java.sql.Connection;
import java.sql.PreparedStatement;
import java.sql.ResultSet;
import java.sql.SQLException;
import org.hibernate.HibernateException;
import org.hibernate.engine.spi.SharedSessionContractImplementor;
import org.hibernate.id.IdentifierGenerator;
import org.slf4j.Logger;
import io.blocko.model.Board;
import io.blocko.model.SimpleUser;
public class IdGenerator implements IdentifierGenerator {
private final Logger logger = getLogger(getClass());
@Override
public Serializable generate(SharedSessionContractImplementor session, Object object) throws HibernateException {
Connection connection = session.connection();
Long id = null;
try {
final String sql = getSql(object);
final PreparedStatement pstmt = connection.prepareStatement(sql);
final ResultSet rs = pstmt.executeQuery();
if (rs.next()) {
id = rs.getLong(1) + 1;
logger.info("Generated Id : " + id);
}
} catch (SQLException e) {
e.printStackTrace();
}
return id;
}
private String getSql(Object object) {
if(object instanceof SimpleUser) {
return "select max(id) from user";
}else if(object instanceof Board) {
return "select max(id) from board";
}else {
return null;
}
}
}

TimeEntity는 @MappedSuperclass를 통해 생성일, 수정일의 공통 정보를 상속을 통해 SimpleUser, Board 객체에 매핑해주는 부모 객체입니다.
@PrePersist 어노테이션은 Entity가 영속성 컨텍스트에 관리되기 직전에 걸려있는 코드를 호출하는 역할을 합니다. @PreUpdate 어노테이션은 Entity를 데이터베이스에 수정하기 직전에 걸려있는 코드를 호출하는 역할을 합니다.
package io.blocko.model;
import java.time.ZoneId;
import java.time.ZonedDateTime;
import java.time.format.DateTimeFormatter;

import javax.persistence.MappedSuperclass;
import javax.persistence.PrePersist;
import javax.persistence.PreUpdate;
import lombok.Getter;
import lombok.Setter;
@MappedSuperclass
@Getter
@Setter
public abstract class TimeEntity {
private String createdDate;
private String updatedDate;
@PrePersist
public void setCreatedDate() {
if (this.createdDate == null) {
this.createdDate = getDate();
}
}
@PreUpdate
public void setUpdatedDate() {
this.updatedDate = getDate();
}
protected String getDate() {
final ZonedDateTime now = ZonedDateTime.now(ZoneId.of("Asia/Seoul"));
final String date = DateTimeFormatter.ofPattern("yyyy-MM-dd HH:mm:ss").format(now);
return date;
}
}
READ
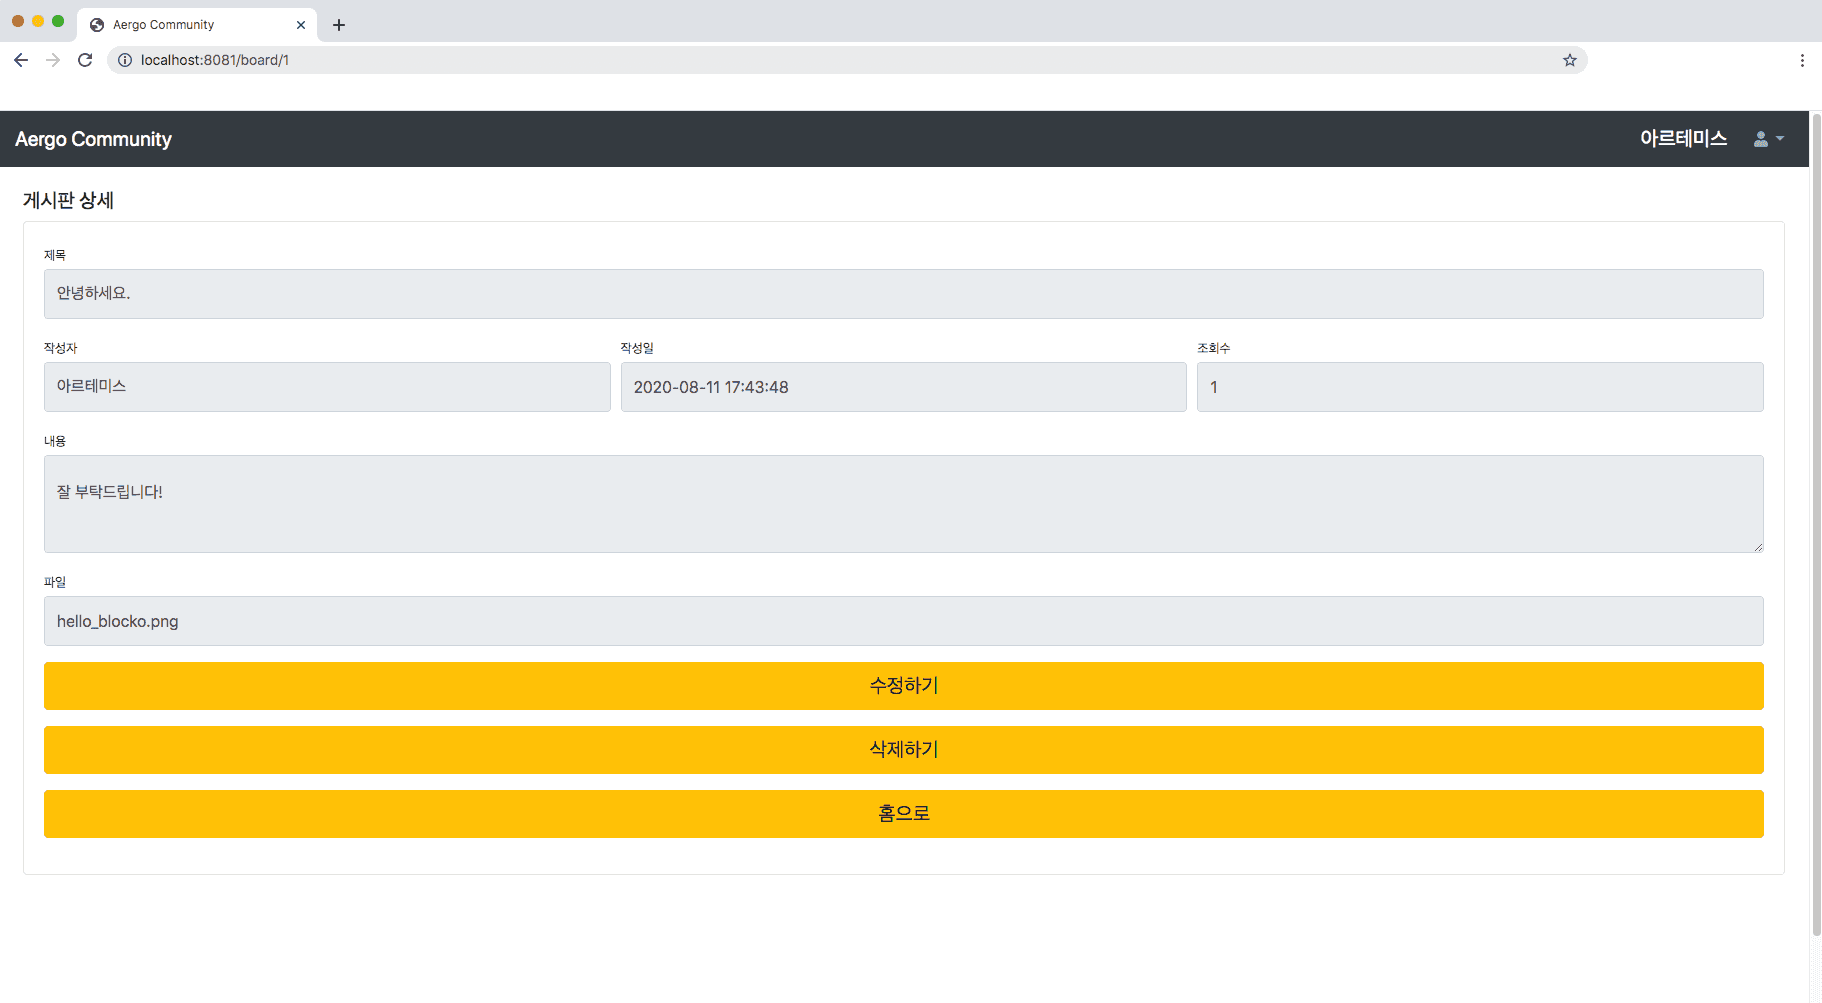
BoardService의 게시판 조회 메서드입니다. 게시판 ID에 상응하는 게시판 데이터를 findById 메서드를 통해 조회합니다.
public Optional<Board> findById(Long id) {
return boardRepository.findById(id);
}
Update
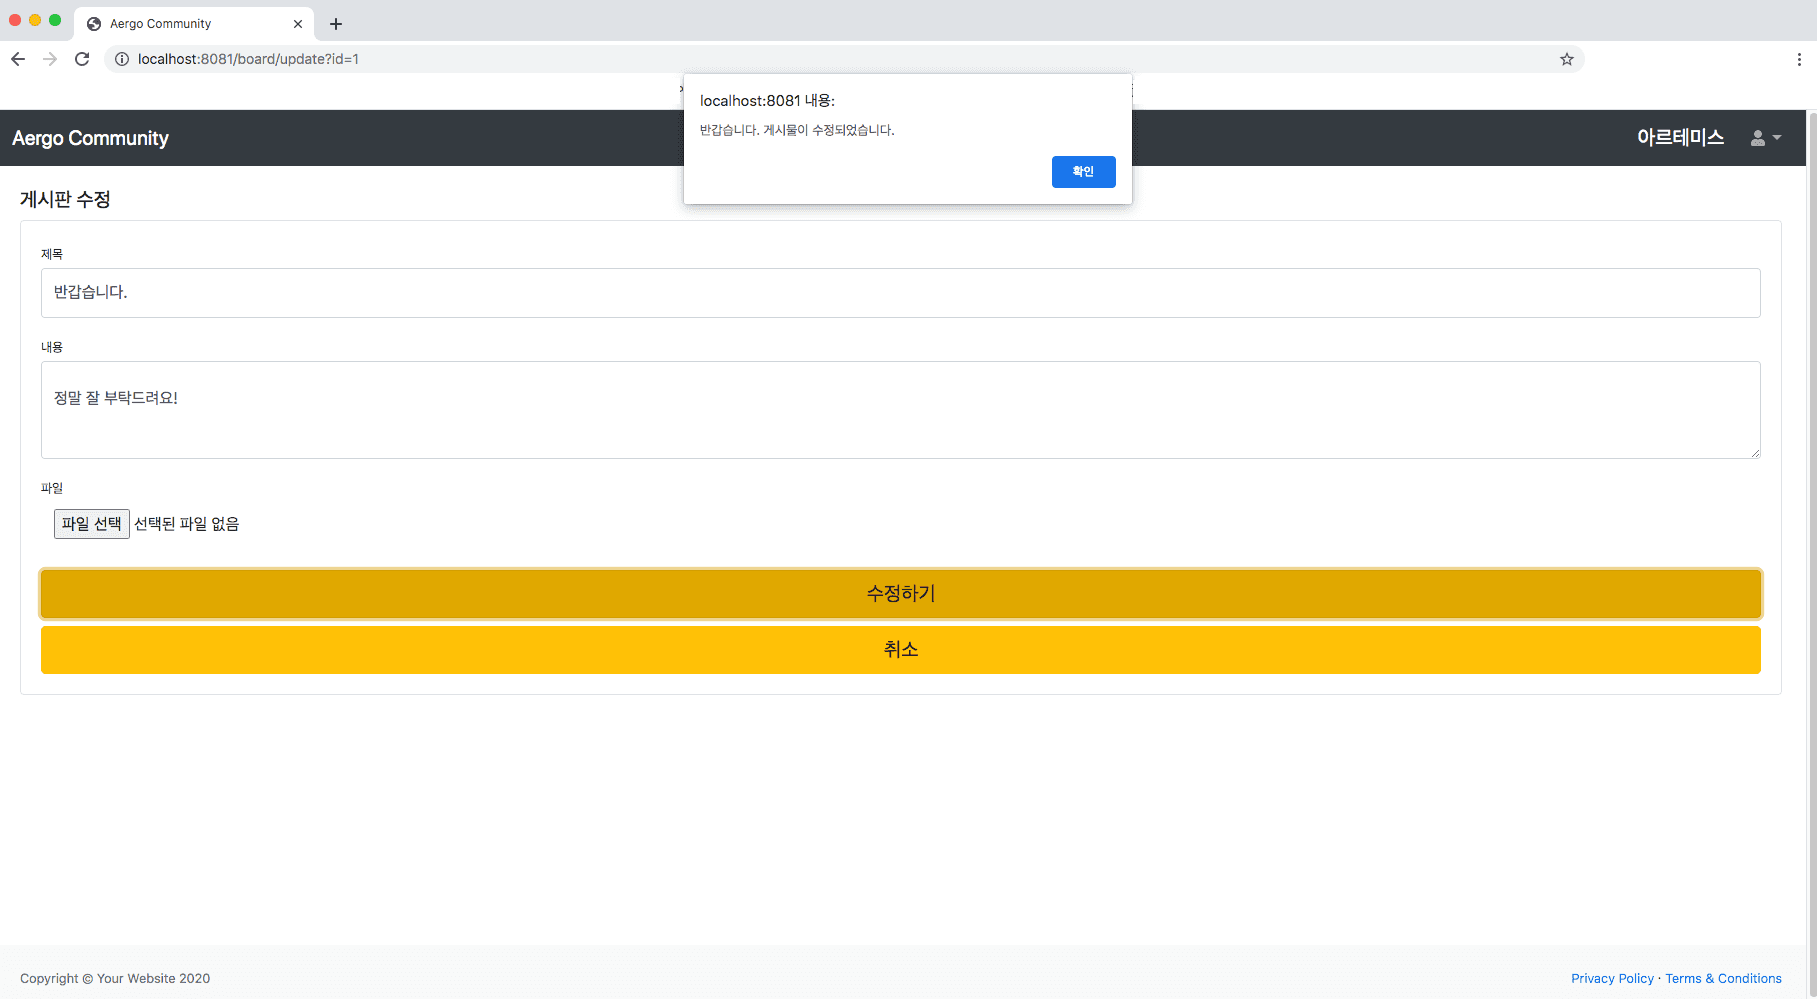
BoardService의 게시판 수정 메서드입니다. save 메서드를 통해 게시판을 수정합니다.
public Board update(BoardUpdateDto updateDto, SimpleUser user) {
Board board = findById(updateDto.getId()).orElseThrow(() -> new RestBoardNotFoundException());
final String title = updateDto.getTitle();
final String content = updateDto.getContent();
final MultipartFile file = updateDto.getFile();
// 원래 파일을 가지고 있는 게시물이면
if (updateDto.getHasAlreadyFile().equals("true")) {
final String updateStatus = updateDto.getUploadStatus();
// 초기 상태이면
if (updateStatus.equals("Init")) {
board.setTitle(title);
board.setContent(content);
board = boardRepository.save(board);
// 파일을 삭제한 상태이면
} else if (updateStatus.equals("Delete")) {
final File originFile = new File(board.getFilePath());
originFile.delete();
board.setTitle(title);
board.setContent(content);
board.setFileName(null);
board.setFilePath(null);
board = boardRepository.save(board);
// 파일을 삭제하고 다른 파일을 업로드한 상태이면
} else if (updateStatus.equals("Upload")) {
final File originFile = new File(board.getFilePath());
originFile.delete();
final String fileName = file.getOriginalFilename();
final String fileExtName = fileName.substring(fileName.lastIndexOf("."), fileName.length());
try {
final String filePath = uploadPath + "/" + UUID.randomUUID().toString().replace("-", "") + fileExtName;
file.transferTo(new File(filePath));
board.setTitle(title);
board.setContent(content);
board.setFileName(fileName);
board.setFilePath(filePath);
board = boardRepository.save(board);
} catch (Exception e) {
throw new BoardFileUploadException(fileName);
}
} else {
throw new BoardUpdateStatusNotFoundException();
}
// 원래 파일을 가지고 있지 않은 게시물이면
} else {
final String updateStatus = updateDto.getUploadStatus();
// 초기 상태이면
if (updateStatus.equals("Init")) {
board.setTitle(title);
board.setContent(content);
board = boardRepository.save(board);
// 파일을 업로드한 상태이면
} else if (updateStatus.equals("Upload")) {
final String fileName = file.getOriginalFilename();
final String fileExtName = fileName.substring(fileName.lastIndexOf("."), fileName.length());
try {
final String filePath = uploadPath + "/" + UUID.randomUUID().toString().replace("-", "") + fileExtName;
file.transferTo(new File(filePath));
board.setTitle(title);
board.setContent(content);
board.setFileName(fileName);
board.setFilePath(filePath);
board = boardRepository.save(board);
} catch (Exception e) {
throw new BoardFileUploadException(fileName);
}
} else {
throw new BoardUpdateStatusNotFoundException();
}
}
return board;
}
Delete
BoardService의 게시판 삭제 메서드입니다. 게시판 ID에 상응하는 게시판 데이터를 deleteById 메서드를 통해 삭제합니다.
public void delete(Board board) {
if (board.getFilePath() != null) {
final File file = new File(board.getFilePath());
file.delete();
}
boardRepository.deleteById(board.getId());
}
참고 자료
게시판 프로젝트 Github
Aergo 개발자 가이드
Aergo JDBC Github
Atom Athena IDE 가이드
